- Kauf auf Rechnung
- Versandkostenfrei ab 75 € innerhalb Österreich
- Einfacher Rückversand
- Bestell-Telefon 01 662 20 20
Anleitung Nr. 3373
Schwierigkeitsgrad: Einsteiger
Arbeitszeit: 1 Stunde
Hast du ein kleines Kind und suchst nach einer kreativen Beschäftigung? Näh dir dein eigenes Lätzchen – praktisch und stilvoll zugleich! In dieser Anleitung zeigen wir dir, wie du mit einfachen Materialien, die du vielleicht schon zu Hause hast, ein zauberhaftes Lätzchen aus einem Gästehandtuch zaubern kannst. Es wird groß genug sein, um selbst die wildesten Essensschlachten aufzufangen, während es gleichzeitig deinem Tisch ein hübsches Accessoire bietet. Also, greife zu Nadel und Faden, und lass uns loslegen! 

Schritt 1 - Anzeichnen und Ausschneiden
Nehme dein Gästehandtuch zur Hand. Falls du dein Lätzchen selber nähen willst, kannst du auch deinen Stoff, z.B. Frottee ca. in den Maßen 30 x 50 cm zuschneiden und umketteln.
Beginne, indem du die Mitte einer kurzen Seite des Handtuchs markierst. Ziehe von diesem Punkt aus eine senkrechte Linie nach unten, etwa 10 cm lang. Diese kann deinen Bedürfnissen angepasst werden. Unter dieser Linie zeichnest du einen Kreis mit einem Durchmesser von 10 bis 12 cm. Nutze hierfür eine Schablone oder einen runden Gegenstand, den du zur Hand hast, wie eine Schüssel oder eine Geschenkbandrolle. Schneide nun entlang der Linie und das Kreisstück aus. 

Schritt 2 - Schrägband anbringen
Jetzt wird es ein wenig anspruchsvoll, aber keine Sorge, mit guter Vorbereitung ist alles machbar! Falte das Schrägband in der Mitte auf und lege es um die Schnittkante des Handtuchs. Achte darauf, dass das Band fest anliegt, um sicherzustellen, dass du beim Nähen alle Stoffschichten erfasst. Fixiere alles mit den "Wonder Clips" oder Stecknadeln in kurzen Abständen. Nähe das Schrägband mit einem Geradstich entlang der Kante an, arbeite dabei langsam und korrigiere gegebenenfalls den Sitz des Schrägbandes. Solltest du bemerken, dass nicht alle Schichten vernäht sind, nähe einfach an den betroffenen Stellen nach. 

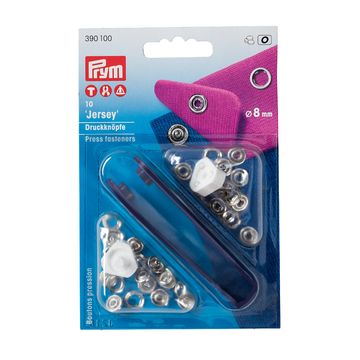
Schritt 3 - Snaps anbringen


Schritt 4 - Applikationen aufbügeln


Wenn dir diese Anleitung gefallen hat und du die Materialien dazu benötigst, besuche unseren Online-Shop. Dort findest du alles, was du brauchst, um loszulegen!